环境搭建目标
pc 可以通过 串口 连接到 开发板,并能查看输出日志pc 可以通过 ssh 连接到 开发板。开发板默认登录用户名: root,无密码- 在
pc 上配置好 arm 交叉编译工具链
- 准备好常用的源码:
uboot源码、linux源码、buildroot源码
我使用 manjaro 作为开发环境;使用 imx6ull pro 作为运行/学习环境,开发板下载的工具里没有linux平台的,因此需要从下载资料的 ubuntu 虚拟机里提取。
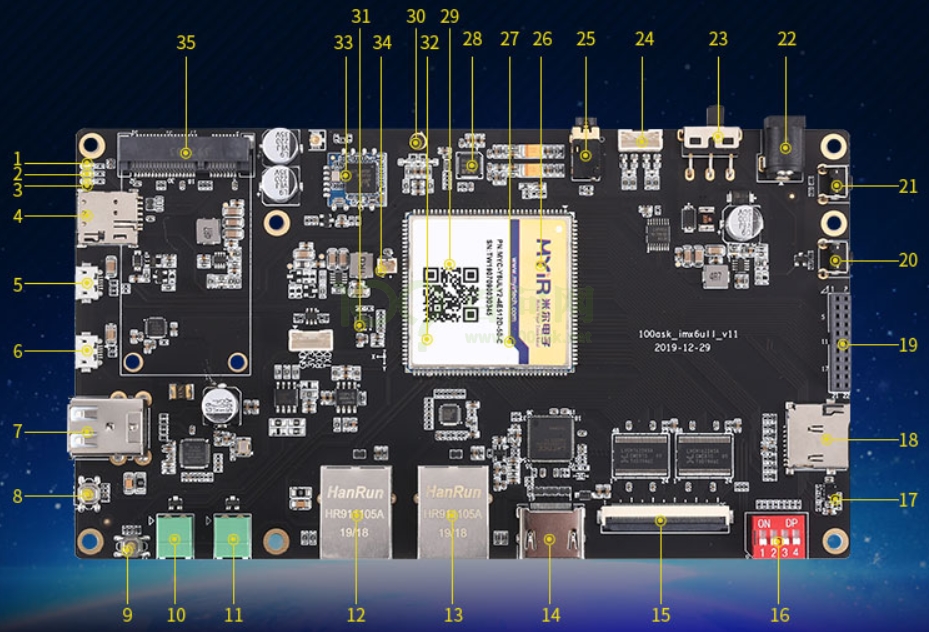
开发板展示
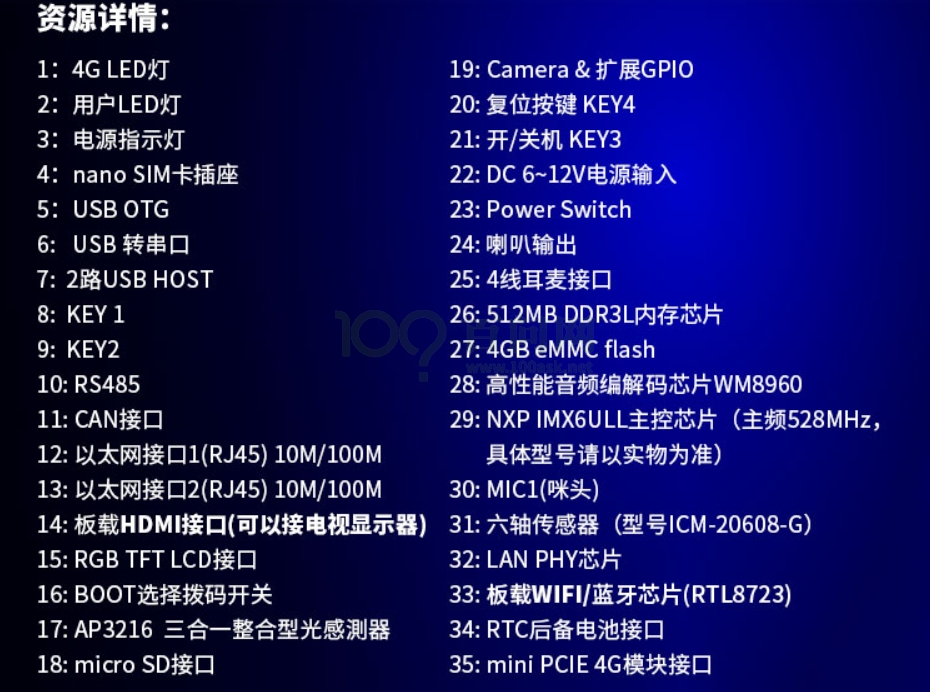
 各标号硬件含义

开发板启动方式(上图表号16对应状态)
| boot |
sw1(lcd_data5) |
sw2(lcd_data11) |
sw3(boot_mode0) |
sw4(boot_mode1) |
| emmc |
OFF |
OFF |
ON |
OFF |
| sd |
ON |
ON |
ON |
OFF |
| usb |
X |
X |
OFF |
ON |
注意:当设为 USB 启动时候,不能插上SD卡、TF卡;上电之后才可以插卡。刚出厂的板子在 emmc 上烧写了系统,开发板启动方式需要设置为 emmc 启动。
第一次启动开发板
- 设置开发板的打开方式为 emmc,打开电源开关
接串口
- 下载 linux 串口驱动程序
https://www.silabs.com/developers/usb-to-uart-bridge-vcp-drivers 并编译之后在源码目录执行insmod ./xxx.ko,插入编译生成的内核模块(xxx.ko文件)
- 连接开发板电源线并打开开关,插拔 usb 线观察
/dev/ 下设备变化,发现插入 usb 后会多出 ttyUSB0 这一设备
- 执行
pacman -S minicom 下载 minicom
- 打开串口
minicom -D /dev/ttyUSB0 然后重启开发板(直接断点和上电),后续就可以通过 minicom 看到串口日志了(需要开发板默认打开串口输出)
ssh 连接到开发板
- 给开发板联网并重启,在
系统选项里设置网络(ip、子网掩码、网关)并用 PC ssh 连接上去
- 接上串口,用
minicom 来观察日志输出
搭建环境
下载开相关源码及工具
百度网盘下载,提取码:root
配置 arm gcc 交叉编译环境(使用imx6ull资料配置)
- 解压缩 ubuntu 的虚拟机文件(如果压缩文件是多个,需要都选中然后解压)
- 查看解压后的文件有几个
*.vmdk 文件,如果是多个则需要使用 vdiskmanager 合并为一个
- 使用
qemu-img 把 xxx.vmdk 文件转为 qemu 支持的 qcow2 文件
我的 linux 工作机用 qemu 而不是 vmware
- 挂载转换后的文件系统
- 使用
mount挂载虚拟硬盘的家目录,大概是 /dev/nb0p4 挂载后可以通过 ls 命令看到book文件夹,这就是家目录,然后把文件 100ask_imx6ull-sdk 复制出来,在这个文件夹的ToolChain目录下有需要的arm编译链,具体目录是 100ask_imx6ull-sdk/ToolChain/arm-buildroot-linux-gnueabihf_sdk-buildroot
- 配置环境变量,修改
~/.bashrc 添加如下配置:
1
2
3
4
|
export ARCH=arm
export CROSS_COMPILE=arm-buildroot-linux-gnueabihf-
PATH=<arm交叉编译根目录>/bin:${PATH}
export PATH=$(echo ${PATH} | sed 's/:/\n/g' | sort | uniq | tr -s '\n' ':' | sed 's/:$//g')
|
- 配置好后重新打开终端或执行
source ~/.bashrc 之后打开终端,运行 arm-buildroot-linux-gnueabihf-gcc -v,查看是否有如下信息输出(如果没有,重新执行这一步):
1
2
3
4
5
6
7
|
Using built-in specs.
COLLECT_GCC=/data/environment/gcc-arm/bin/arm-buildroot-linux-gnueabihf-gcc.br_real
COLLECT_LTO_WRAPPER=/data/environment/gcc-arm/bin/../libexec/gcc/arm-buildroot-linux-gnueabihf/7.5.0/lto-wrapper
Target: arm-buildroot-linux-gnueabihf
Configured with: ./configure --prefix=/home/book/100ask_imx6ull-sdk/Buildroot_2020.02.x/output/host --sysconfdir=/home/book/100ask_imx6ull-sdk/Buildroot_2020.02.x/output/host/etc --enable-static --target=arm-buildroot-linux-gnueabihf --with-sysroot=/home/book/100ask_imx6ull-sdk/Buildroot_2020.02.x/output/host/arm-buildroot-linux-gnueabihf/sysroot --enable-__cxa_atexit --with-gnu-ld --disable-libssp --disable-multilib --disable-decimal-float --with-gmp=/home/book/100ask_imx6ull-sdk/Buildroot_2020.02.x/output/host --with-mpc=/home/book/100ask_imx6ull-sdk/Buildroot_2020.02.x/output/host --with-mpfr=/home/book/100ask_imx6ull-sdk/Buildroot_2020.02.x/output/host --with-pkgversion='Buildroot 2020.02-gee85cab' --with-bugurl=http://bugs.buildroot.net/ --disable-libquadmath --enable-tls --enable-plugins --enable-lto --enable-threads --with-isl=/home/book/100ask_imx6ull-sdk/Buildroot_2020.02.x/output/host --with-abi=aapcs-linux --with-cpu=cortex-a7 --with-fpu=neon-vfpv4 --with-float=hard --with-mode=arm --enable-languages=c,c++,fortran --with-build-time-tools=/home/book/100ask_imx6ull-sdk/Buildroot_2020.02.x/output/host/arm-buildroot-linux-gnueabihf/bin --enable-shared --enable-libgomp
Thread model: posix
gcc version 7.5.0 (Buildroot 2020.02-gee85cab)
|
上述2、3、4步相关教程可以查看qcow2虚拟分区挂载
配置arm gcc交叉编译环境(这个留备后续使用,不需要配置)
- arm 交叉编译工具下载地址: arm 交叉编译工具下载地址,或者复制到浏览器下载(这个包宿主机是x86,目标代码编译成arm的):
https://armkeil.blob.core.windows.net/developer/Files/downloads/gnu/11.2-2022.02/binrel/gcc-arm-11.2-2022.02-x86_64-arm-none-linux-gnueabihf.tar.xz
- 下载并解压之后放置指定目录并改名为
gcc-arm,比如: /data/envrionment/gcc-arm/
- 配置环境变量,编辑
~/.bashrc,在末尾加入如下代码:
1
2
3
4
|
export ARCH=arm
export CROSS_COMPILE=arm-buildroot-linux-gnueabihf-
PATH=<arm交叉编译根目录>/bin:${PATH}
export PATH=$(echo ${PATH} | sed 's/:/\n/g' | sort | uniq | tr -s '\n' ':' | sed 's/:$//g')
|
- 配置好后重新打开终端或执行
source ~/.bashrc 之后打开终端,运行 arm-none-linux-gnueabihf-gcc -v,查看是否有如下信息输出(如果没有,重新执行这一步):
1
2
3
4
5
6
7
8
|
Using built-in specs.
COLLECT_GCC=arm-none-linux-gnueabihf-gcc
COLLECT_LTO_WRAPPER=/data/environment/gcc-arm/bin/../libexec/gcc/arm-none-linux-gnueabihf/11.2.1/lto-wrapper
Target: arm-none-linux-gnueabihf
Configured with: /data/jenkins/workspace/GNU-toolchain/arm-11/src/gcc/configure --target=arm-none-linux-gnueabihf --prefix= --with-sysroot=/arm-none-linux-gnueabihf/libc --with-build-sysroot=/data/jenkins/workspace/GNU-toolchain/arm-11/build-arm-none-linux-gnueabihf/install//arm-none-linux-gnueabihf/libc --with-bugurl=https://bugs.linaro.org/ --enable-gnu-indirect-function --enable-shared --disable-libssp --disable-libmudflap --enable-checking=release --enable-languages=c,c++,fortran --with-gmp=/data/jenkins/workspace/GNU-toolchain/arm-11/build-arm-none-linux-gnueabihf/host-tools --with-mpfr=/data/jenkins/workspace/GNU-toolchain/arm-11/build-arm-none-linux-gnueabihf/host-tools --with-mpc=/data/jenkins/workspace/GNU-toolchain/arm-11/build-arm-none-linux-gnueabihf/host-tools --with-isl=/data/jenkins/workspace/GNU-toolchain/arm-11/build-arm-none-linux-gnueabihf/host-tools --with-arch=armv7-a --with-fpu=neon --with-float=hard --with-mode=thumb --with-arch=armv7-a --with-pkgversion='GNU Toolchain for the Arm Architecture 11.2-2022.02 (arm-11.14)'
Thread model: posix
Supported LTO compression algorithms: zlib
gcc version 11.2.1 20220111 (GNU Toolchain for the Arm Architecture 11.2-2022.02 (arm-11.14))
|
这里需要注意的是,如果下载的 arm 编译工具链与开发板文件系统的编译工具链 gcc 不一致,则会导致在 pc 上用跨平台编译工具链编译出来的程序无法在 arm 开发板上运行。解决办法:1. 重新编译开发板根文件系统、内核并烧写;2. 使用官方提供的交叉编译工具链
安装 make 项目管理命令
cortexA7 烧写工具
- imx6ull 官方烧写工具是
mfgtools 操作简单,一键烧写整个镜像<用这个就可以>
- nxp 提供的 uuu (Universal Update Utility) 又名
mfgtools 3.0
这块具体使用后续会有介绍
4. mkimage 工具
这一工具来源于 u-boot,用来给一个 bin 文件添加头部信息,芯片固件需要根据头部信息把 bin 文件放到内存中去执行
执行 pacman -S u-boot 命令后,再次执行 mkimage -h 查看是否正确安装:
 1
 2
 3
 4
 5
 6
 7
 8
 9
10
11
12
13
14
15
16
17
18
19
20
21
22
23
24
25
26
27
28
29
30
31
32
|
mkimage: invalid option -- 'h'
Error: Invalid option
Usage: mkimage -l image
          -l ==> list image header information
       mkimage [-x] -A arch -O os -T type -C comp -a addr -e ep -n name -d data_file[:data_file...] image
          -A ==> set architecture to 'arch'
          -O ==> set operating system to 'os'
          -T ==> set image type to 'type'
          -C ==> set compression type 'comp'
          -a ==> set load address to 'addr' (hex)
          -e ==> set entry point to 'ep' (hex)
          -n ==> set image name to 'name'
          -d ==> use image data from 'datafile'
          -x ==> set XIP (execute in place)
       mkimage [-D dtc_options] [-f fit-image.its|-f auto|-F] [-b <dtb> [-b <dtb>]] [-E] [-B size] [-i <ramdisk.cpio.gz>] fit-image
           <dtb> file is used with -f auto, it may occur multiple times.
          -D => set all options for device tree compiler
          -f => input filename for FIT source
          -i => input filename for ramdisk file
          -E => place data outside of the FIT structure
          -B => align size in hex for FIT structure and header
Signing / verified boot options: [-k keydir] [-K dtb] [ -c <comment>] [-p addr] [-r] [-N engine]
          -k => set directory containing private keys
          -K => write public keys to this .dtb file
          -G => use this signing key (in lieu of -k)
          -c => add comment in signature node
          -F => re-sign existing FIT image
          -p => place external data at a static position
          -r => mark keys used as 'required' in dtb
          -N => openssl engine to use for signing
       mkimage -V ==> print version information and exit
Use '-T list' to see a list of available image types
|
最后来一个例子
在开发机上编写一个例子
1
2
3
4
5
6
7
8
|
#include <stdio.h>

int main (int argc, char* argv[])
{
    printf ("Hello World!\n");

    return 0;
}
|
开发机上的Makefile
 1
 2
 3
 4
 5
 6
 7
 8
 9
10
11
12
13
|
CC = arm-buildroot-linux-gnueabihf-gcc
CUR_DIR = $(shell pwd)
SRC = $(strip $(subst $(CUR_DIR), ., $(wildcard $(CUR_DIR)/*.c)))
TARGET = $(strip $(patsubst %.c, %.run, $(SRC)))

all:${TARGET}

%.run:%.c
        ${CC} -o $@ $<

clean:
        rm -f *.run
        rm -f *.o
|
编译
分别保存上述代码为 hello-world.c、makefile脚本为 Makefile,两个文件放在同级目录,执行 make 会在当前目录下生成 hello-world.run,使用 scp ./hello-world.run root@<开发机ip>:~ 把编译好的二进制文件传输到开发机,最后使用 ssh 登录到开发机上家目录执行 ./hello-world.run 即可看到输出结果。
至此,开发环境和开发板打通。
 各标号硬件含义
